What is XNA?
XNA is a development framework created by Microsoft which encapsulates low-level technological details involved in creating a game and allows you to concentrate on what makes the game fun. The XNA Framework runs on top of the .NET Framework, Microsoft’s standard development platform, and consists of a library of tools and code that allows developers to quickly create games for Windows, XBox 360 and Windows Phone 7.
The XNA Framework has evolved over the years and now includes support audio and video playback, Xbox Live multi-player features, Xbox 360 avatars, and more. Most importantly for your purposes, it makes it easy to draw on the screen of the device that you’re working with.
Create Your Project
In this tutorial, you’re going to build a simple application called Bouncing Balls. The screen will start blank. When you touch the screen, a new ball with a random velocity and color is added to the collection of bouncing balls. If you tap on the screen again another ball will be added. This application should take less than 30 minutes to create.
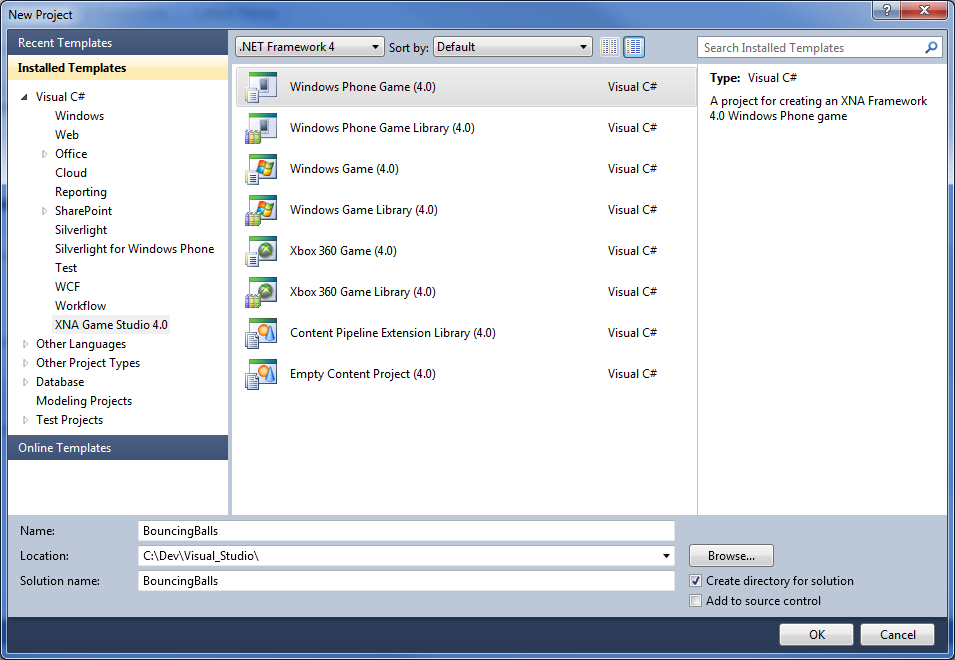
To begin, open Microsoft Visual Studio 2010 Express for Windows Phone. Once open, click the “New Project…” link in the left sidebar. In the dialog box that pops up, choose “XNA Game Studio 4” in the left column and make sure the “Windows Phone Game (4.0)” item is selected. Then, give your project a name. For this tutorial, I recommend calling your project “BouncingBalls.” Confirm that the “Create directory for solution” checkbox is selected. If you’ve done all this, your dialog will appear similar to mine (with less options, most likely):
Click “OK” to create your new project. Visual Studio will create all the required files in your specified directory and open Game1.cs for you.
Importing Required Resources
For this project, you’ll be using sprites to draw the balls on the screen. As such, you need to import an image into the project to use as the ball sprite. Download the following image by right clicking and save it somewhere convenient. It is a simple 512px diameter white circle that I created in Photoshop, and the file can also be found in the project sample code available with this tutorial.

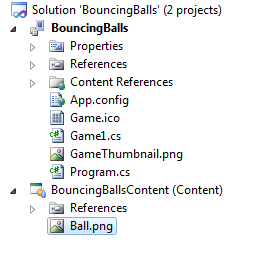
In Visual Studio, find the Solution Explorer in the right sidebar. Look for a list item called BouncingBallsContent (Content) and right click on it. From the context menu that appears, hover over “Add” and select “Existing Item…” Browse to the Ball.png file and add it to your project. Your solution explorer should now look like the following:
Understanding the Game Flow
When you use the XNA framework, all the games you create have the same basic flow. First, an instance of your game object is constructed. By default, Visual Studio names your game file Game1.cs and your game class Game1.
Once your game is constructed, the Initialize method is called. Initialize gives you a chance to load up required services and any non-graphic related content. Next, the LoadContent method is called. LoadContent is where you load the graphic content you need for your game to draw itself. Finally, an infinite loop is started where your game’s Update and Draw methods are called in succession until your game quits.
Set the Game to FullScreen
On Windows Phone 7, you have the ability to set your game to run in full screen mode. This hides the phone’s status display and gives you more room to work with. As such, it is advisable that most games be run in full screen mode.
To enable full screen, find your game class’s constructor and place your cursor inside of it. You’re going to set a property on your graphics device manager that tells your game to run in full screen mode. Modify the constructor so that it looks like the following:
- public Game1()
- {
- graphics = new GraphicsDeviceManager(this);
- graphics.IsFullScreen = true;
- Content.RootDirectory = "Content";
- // Frame rate is 30 fps by default for Windows Phone.
- TargetElapsedTime = TimeSpan.FromTicks(333333);
- // Pre-autoscale settings.
- graphics.PreferredBackBufferWidth = 480;
- graphics.PreferredBackBufferHeight = 800;
- }
Load Your Sprite’s Texture
The next thing we need to do is load the ball texture that will be used for all balls in the game. Because we don’t want to be loading the texture over and over again, we’re going to store it as a public field in our game.
The first thing you need to do is create a new public field in the Game1 class. At the top of your class definition, close to the pregenerated fields, add a declaration for a Texture2D object so your field section looks like the following:
- GraphicsDeviceManager graphics;
- SpriteBatch spriteBatch;
- Texture2D ballTexture;
Now, you need to actually get the texture loaded. Find your Game1 class’s LoadContent and insert the following statement:
- ballTexture = Content.Load<Texture2D>("Ball");
Creating The Ball Class
Your application is going to contain a number of balls that appear and move around the screen. As such, it makes sense to create a new class that contains information about a ball. First, right click on your project’s name in the Solution Explorer, hover over “Add” and click “Class…” Name the class Ball.cs.
The ball class needs to store the following information about the ball:
- the containing game object
- color
- texture
- top left location
- velocity
- radius
- scale between sprite size and actual radius
As such, we’ll need to create fields in the Ball class for each of these items. At the top of your Ball class, add the following code:
- Game1 game;
- Color color;
- Texture2D texture;
- Vector2 topLeft;
- Vector2 velocity;
- float radius;
- float scale;
Now, you need to make sure each one of these items gets initialized when a Ball is created. You need to create a constructor that takes the appropriate parameters. The scale field is derived from the radius and texture size, so that does not need to be passed to the constructor. Add the following to your Ball class:
- public Ball(Color color, Texture2D texture, Vector2 center, Vector2 velocity, float radius)
- {
- this.game = game;
- this.color = color;
- this.texture = texture;
- this.topLeft = new Vector2(center.X - radius, center.Y - radius);
- this.velocity = velocity;
- this.radius = radius;
- CalculateScale();
- }
You’ll notice that each of the parameters is assigned to an instance field. Then, a new method called CalculateScale is called. This method calculates the scale between the desired radius and the actual sprite size for a particular instance of a ball. Add the following to your Ball class:
- private void CalculateScale()
- {
- float width = (float)texture.Bounds.Width;
- this.scale = (this.radius * 2) / width;
- }
There are two last items that need to happen with every ball. A ball needs to be able to draw itself and update itself. Let’s start with drawing. Create the Draw method in your Ball class as follows:
- public void Draw(SpriteBatch batch)
- {
- batch.Begin();
- batch.Draw(texture, topLeft, null, color, 0f, Vector2.Zero, scale, SpriteEffects.None, 0f);
- batch.End();
- }
You’ll see in the above code that the Draw method is passed a SpriteBatch object. This SpriteBatch is used to draw the sprite for the ball. You start drawing with the SpriteBatch by calling Begin and stop drawing by callind End. In the middle, you use the Draw method on the SpriteBatch object to actually draw the ball.
The SpriteBatch.Draw method takes a number of parameters, but the most important are texture, topLeft, color, and scale:
- texture is the Texture2D that will be drawn with this call
- topLeft is the position of the sprite in the graphics device
- color is the color to tint the sprite
- scale is the factor by which to scale the sprite
Now, let’s handle updates. Add the following two methods to your Ball class:
- public void Update()
- {
- BounceBall();
- topLeft += velocity;
- }
- private void BounceBall()
- {
- Vector2 newTopLeft = topLeft + velocity;
- float left, right, top, bottom;
- left = newTopLeft.X;
- right = newTopLeft.X + (radius * 2);
- top = newTopLeft.Y;
- bottom = newTopLeft.Y + (radius * 2);
- if (top < 0 || bottom > game.GraphicsDevice.Viewport.Height)
- {
- velocity.Y *= -1;
- }
- if (left < 0 || right > game.GraphicsDevice.Viewport.Width)
- {
- velocity.X *= -1;
- }
- }
As you can see, the Update method is quite simple. It delegates to the BounceBall method which handles updating the velocity, and then updates the
topLeft variable by combining it with the ball’s velocity. The BounceBall method looks a little complicated, but it is really quite simple. First, you calculate what the new top, bottom, right and left bounds of the ball after a velocity step. Then, you check to see if these new bounds are outside of the viewable area of the phone. If either top or bottom will be outside of the viewable area, you reverse the Y velocity direction. If either right or left will be outside of the viewable area, you reverse the X velocity direction. This is what makes the ball actually bounce.At this point, you’ve got a complete Ball class and we can start addding them to the Game1 class.
Storing the Balls
You’ll store the balls for your game inside of your Game1 class. Open Game1.cs and add a new field as follows:
- IList<Ball>
- balls = new List<Ball>();
This statement creates and instantiates a container for the Balls that will be drawn on the screen.
Handling Touch Events and Creating Balls
The last part of this application is to let users create balls by tapping the screen. This needs to happen in the game’s update loop. Find the Update method for your Game1 class and insert the following statements inside it:
- HandleTouches();
- UpdateBalls();
Under the Update method, create the two new methods, HandleTouches and UpdateBalls. UpdateBalls should look like the following:
- private void UpdateBalls()
- {
- foreach (Ball ball in balls)
- {
- ball.Update();
- }
- }
This method is simple. It iterates over each ball in the Game1 class’s List of
balls and calls its Update method. If you remember from earlier, the Ball.Update() method simply changes the Ball’s position. The next method is slightly more complex. Your HandleTouches method should look like the following:- private void HandleTouches()
- {
- TouchCollection touches = TouchPanel.GetState();
- if (!touching && touches.Count > 0)
- {
- touching = true;
- Random random = new Random(DateTime.Now.Millisecond);
- Color ballColor = new Color(random.Next(255), random.Next(255), random.Next(255));
- Vector2 velocity = new Vector2((random.NextDouble() > .5 ? -1 : 1) * random.Next(9), (random.NextDouble() > .5 ? -1 : 1) * random.Next(9)) + Vector2.UnitX + Vector2.UnitY;
- Vector2 center = new Vector2((float)graphics.GraphicsDevice.Viewport.Width / 2, (float)graphics.GraphicsDevice.Viewport.Height / 2);
- float radius = 25f * (float)random.NextDouble() + 5f;
- balls.Add(new Ball(this, ballColor, ballTexture, center, velocity, radius));
- }
- else if(touches.Count == 0)
- {
- touching = false;
- }
- }
Do you see that
touching variable in there? That stores whether the screen was being touched on the last pass through Update. This ensures that a prolonged touch does not create multiple balls. You need to create that as a field in the Game1 class, so scroll up to your fields and add it as follows:- bool touching = false;
Now, let’s go through the rest of the method. First, you retrieve the collection of touches that are currently happening on the TouchPanel, in this instance the screen of the phone. If there are touches occuring and the screen wasn’t being touched on the last pass then you initialize a variety of variables pertaining to the new Ball. The variables are initialized with a the help of an instance of the Random class. You have a random color, random velocity and a random radius. The ball will always start centered on the phone’s screen.
Drawing the Balls
The last thing you need to do is tell the balls to draw themselves on the screen. Check the Draw method in your Game1 class to the following:
- protected override void Draw(GameTime gameTime)
- {
- GraphicsDevice.Clear(Color.White);
- foreach (Ball ball in balls)
- {
- ball.Draw(spriteBatch);
- }
- base.Draw(gameTime);
- }
Here, you’re just setting the color of the screen to White and then instructing each Ball object to draw itself on the screen.
Finishing Up
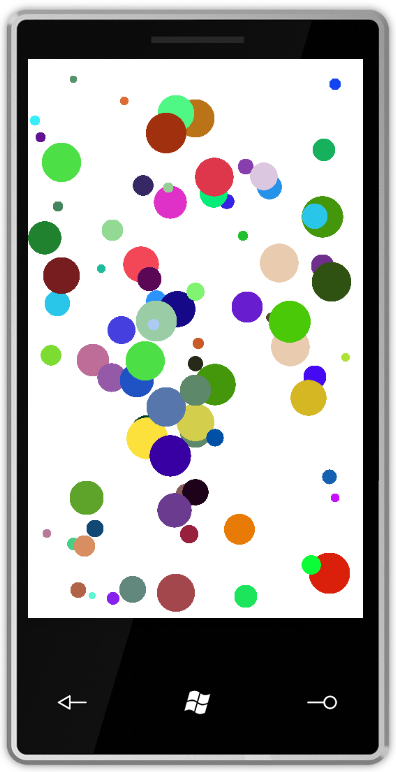
At this point you’ve got a fully functional game. The Ball class encapsulates information about each ball that will bounce around the screen and the Game1 class handles input and manages the collecton of Ball objects. Hit F5 to Build and Run your solution on the Windows Phone 7 simulator. You’ll see a blank white screen. Tap (or click) on the Windows Phone 7 simulator and a new ball will appear. Continue to click until you’re satisfied with the number of balls on the screen. You can close the simulator at any time. If everything is working correctly, you’ll end up with something like the following:
typing master pro crack
ReplyDeleteeaseus partition master key
lumion pro full crack
ccleaner crack
gladiator vst crack
lumion pro crack
disk drill crack
malwarebytes crack
driver easy pro crack
virtual dj crack